How to Install & Use UncensorVPN on Windows | Step-by-Step Guide
Setup UncensorVPN Windows App
Download UncensorVPN App
Install UncensorVPN App
Login to UncensorVPN App
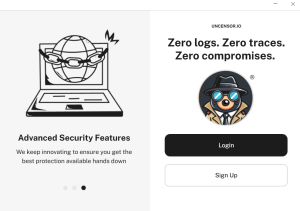
Once your installation is successful, here’s how you can proceed to login to the UncensorVPN application.
- Launch UncensorVPN app and a pop-up window will appear and you will be required to enter your account credentials.

- Enter your account credentials and click Login.

- You will be logged in to the app.
Logout from UncensorVPN app
Want to log out of the UncensorVPN app? Here’s a quick and easy way to do it—just follow these simple steps.
- Click the Profile🙍♂️icon from the left panel of the UncensorVPN app.

- Click Sign Out.

- Click Yes to confirm and proceed.
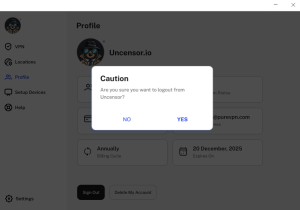
- You have successfully logged out from UncensorVPN application
Check Subscription Details on UncensorVPN App
Want to check your subscription details in the UncensorVPN app? Just follow the steps below to see everything you need in a few quick taps.
- Click the Profile🙍♂️icon from the left panel of the UncensorVPN app.
- In this section you will be able to see the subscription details.
Following are the details that will be visible in the Profile section.
- VPN Username
- Subscription Type
- Subscription Status
- Billing Cycle
- Subscription Expiry

Connect and Manage Locations
Connect via fastest VPN server
Curious about the fastest server? It’s the one our smart algorithm picks for you—based on your location—to give you the best possible speed. Want to connect to it? Just follow the steps below 👇
- For users who are connecting to UncensorVPN for the first time, they can simply click the Connect icon at the center and the app will connect you to the fastest VPN server.
- If your connection was successful, you should see the connected status. To disconnect, click the button located at the center of the UncensorVPN app.

Connect with your preferred location
- Click the Locations icon at the left panel of the UncensorVPN app.
- Choose your desired location from the list of countries.

- You are now connected to the UncensorVPN app with your desired location.
Connect with your desired city
This feature lets you explore and connect to different cities within a country—right from the UncensorVPN app. Want to pick a specific city? Just follow the steps below 👇
- Click the Locations icon at the left panel of the UncensorVPN app.
- Click the Arrow icon provided besides locations and a list of cities will be displayed.
- List of available cities will be displayed next to each country.
- Choose your desired City to get connected.

- You are now Connected to your desired city.
Disconnect UncensorVPN
Our disconnect option is just as easy to connect. To disconnect, follow the instructions below 👇
- Just hover your cursor over the connected icon—it’ll turn black to let you know you can click to disconnect.
- Upon clicking the icon, you are now disconnected.
How to Switch Protocol
To switch between VPN protocols in the UncensorVPN app, make sure you’re disconnected first. Then, just turn off the “Automatic Protocol Selection” option to see and choose from the available protocols.
Each protocol can affect your connection’s speed and stability, so it’s important to pick the right one. We usually recommend sticking with the automatic option—it selects the best settings for you. But if that doesn’t work well in your case, feel free to try switching to another protocol manually.
Protocol Guide:
Wireguard: (Recommended)
Wireguard provides a fast and secure VPN connection and it’s usually used for web browsing and streaming.
UDP:
UDP is mainly used for streaming and downloading. It provides a fast VPN connection with medium encryption.
TCP:
TCP is more reliable, but also a little slower, and is usually used for web browsing.
IKEv2:
IKEv2 is one of the fastest VPN protocols that provides stable connection and is usually used for streaming and downloading.
Wondering how to switch between protocols? Follow the instructions below 👇
- Click the Settings ⚙️ icon from the left panel of the UncensorVPN app.
- Select VPN Settings.

- Click the Connection Protocol tab.
- Click Manual Protocol Selection to change your protocol selection.

- A warning will appear, click Proceed to continue.
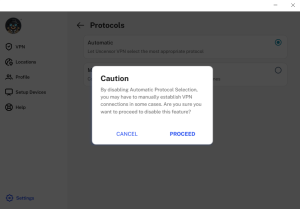
- Choose your desired protocol from the drop-down menu.

Connect to Fallback: This option will connect you to the next best available option if you are unable to connect with your preferred protocol.
Activate Split Tunneling
Split tunneling lets you choose which apps or device traffic go through the encrypted VPN tunnel—while everything else connects to the internet normally. Want to turn it on? Just follow the steps below 👇
- Click the Settings icon ⚙️ from the left panel of the UncensorVPN app.
- Select the VPN Settings.

- Toggle Enable Split Tunnelling to turn it on.

- When you click the Add Applications icon, you’ll see a list of default apps. Just check the ones you want to include in split tunneling. You can also use the Browse option to pick any installed app of your choice.
- Click Browse to add the program you want to use with split tunneling. Some apps run multiple processes, so to make sure all of their traffic goes through the VPN, be sure to add each one to the split tunneling list.

- Connect to the UncensorVPN app. Once connected, open your internet browser (Ex: Opera – in this case). The selected browser will run under the VPN.

Windows App General Settings
Auto-connect on launch
This feature gives you peace of mind when you’re on the move—especially when using public Wi-Fi or any network you don’t fully trust. Want to turn it on? Just follow the steps below 👇
- Click the Settings icon ⚙️ from the left panel of the UncensorVPN app.
- In the VPN Settings tab, you will see the Enable Auto-Connect at Launch option.
- Toggle Auto-connect on launch to turn it on.

- Once it’s turned on, you will see a drop-down menu from where you can choose the desired option to let the application know which location to connect after launching the app. Following options are available to choose from:
- Recommended Location
- Recently Connected Location
- Specific Location

Internet kill switch
Add an extra layer of privacy without lifting a finger. The Internet Kill Switch works automatically—no setup needed! If your VPN connection ever drops unexpectedly, it instantly cuts off internet access to keep your data and location safe until you’re reconnected. Want to make sure it’s turned on? Just follow the steps below 👇
- Click the Settings icon ⚙️ from the left panel of the UncensorVPN app.
- In the VPN Settings tab, you will see the Internet Kill Switch option.
- Toggle Enable IKS to turn it on.
- That’s it! You are now even more protected 😉 Your internet will automatically get disconnected upon disconnection.
Auto update
At UncensorVPN, we’re always working to improve your experience—that’s why we regularly update our features to keep things running smoothly and efficiently. Stay up-to-date with the latest enhancements in the app. Want to make sure this feature is enabled? Just follow the steps below 👇
- Click the Settings icon ⚙️ from the left panel of the UncensorVPN app.
- Click the App Settings tab.

- In the App Settings tab, you will see the Update Automatically option.
- Toggle Update Automatically to turn it on.

- UncensorVPN app will now get updated automatically whenever there is a new release.
Clear preference
With this option, you can now revert the UncensorVPN app to its default settings. Want to know how to do it? Follow the instructions below 👇
- Click the Settings icon ⚙️ from the left panel of the UncensorVPN app.
- Click the App Settings tab.
- In the App Settings tab, you will see the Clear all Preferences option.
- Click the Clear to confirm.
- Your app preference has been cleared successfully.
Select Application Language
Looking to use UncensorVPN in your native language? In the UncensorVPN application you can find support for all major languages. How to switch between languages? Follow the instructions below 👇
- Click the Settings icon ⚙️ from the left panel of the UncensorVPN app.
- Click the App Settings tab.
- In the settings, you will see the Language option Click the arrow icon on the language tap.
- Select your desired language.
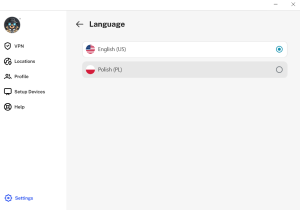
- After clicking you will see the pop pup click to Yes.

Manage Help Section
FAQ
- Click the Help icon from the left panel of the UncensorVPN app.
- You will be able to see and read FAQ.
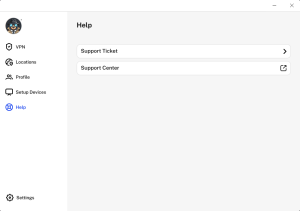
Create a support ticket
Need help? You can easily reach out to our support team and open a ticket right from the UncensorVPN app. Just follow the steps below, and our 24/7 support heroes will be there to assist you with any questions or concerns you have—anytime you need us.
- Click the Help icon from the left panel of the UncensorVPN app.
- Click the Support Ticket tab.

- Create your support ticket, then click the Submit button.

- Once done, your request will be forwarded to the support team and they will get back to you as soon as possible.